
Tin tức
Hướng dẫn rebuild windows 10 với máy tính ảo
Rebuild windows là thao tác xây dựng lại bộ cài đặt windows 10 cho máy tính. Đây là một khái niệm còn khá mới lạ và chưa được nhiều người biết đến do thao tác rebuild khá phức tạp và đỏi hỏi tính chuyên môn cao. Tuy nhiên, người dùng windows vẫn có thể tự rebuild windows 10 tại nhà với hướng dẫn rebuild windows 10 trong bài viết sau.
Contents
Tại sao cần phải rebuild windows 10?
Rebuild windows 10 giúp người dùng tiết kiệm được nhiều thời gian khi thao tác với nhiều máy khác nhau so với khi sử dụng bộ cài đặt gốc. Với những người dùng sử dụng máy được kết nối trong một mạng máy tính nội bộ công ty, việc cài đặt hoặc cập nhật từng máy trong mạng rất bất tiện. Chính vì vậy, rebuild windows 10 giúp xây dựng lại bộ cài đặt hoàn chỉnh để có thể áp dụng cài đặt trên toàn mạng.
Những lưu ý khi rebuild windows 10 cho máy tính
Rebuild windows 10, hay còn được dịch là xây dựng lại hệ thống windows 10, là một việc làm không hề đơn giản. Để có thể rebuild windows 10, trước tiên người dùng cần cài đặt phần mềm quản lý hình ảnh Windows ADK vào máy. Các thao tác rebuild windows 10 sẽ được thực hiện dựa trên phần mềm này, chính vì vậy người dùng cần đảm bảo đã tải phần mềm về máy trước khi rebuild.
Việc rebuild cũng đòi hỏi những kiến thức cơ bản nhất định để tránh gây ra các lỗi code trong quá trình rebuild. Bởi chỉ cần một thao tác hoặc một dòng mã hóa bị sai, quá trình rebuild sẽ báo lỗi và rất khó khắc phục do không phát hiện được lỗi sai ở đâu. Do đó, người dùng cần tìm hiểu thật kỹ các kiến thức cơ bản để quá trình rebuild windows 10 được diễn ra suôn sẻ.
Hướng dẫn rebuild windows 10 từ bộ cài đặt windows gốc
Người dùng windows 10 vẫn có thể tự rebuild windows tại nhà với hướng dẫn rebuild windows 10 dưới đây. Tuy nhiên, việc rebuild đòi hỏi cấu hình máy tính của người dùng phải là phiên bản windows 10 64bit. Trước khi tiến hành rebuild windows, người dùng cần có bộ cài đặt windows gốc, phần mềm Vmware, tệp tin Vmware boot và một chiếc usb có dung lượng từ 8GB trở lên.
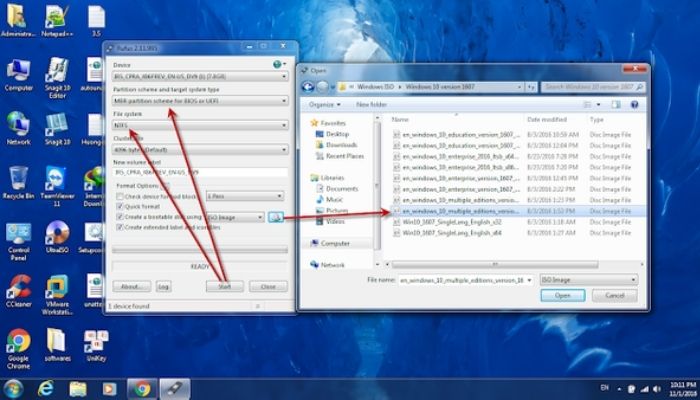
Bước 1: Tạo bộ cài gốc ra usb, tạo thư mục autounattend.xml
Để tạo bộ cài đặt windows gốc ra usb, người dùng có thể sử dụng phần mềm Rufus. Sau khi tải phần mềm Rufus về máy, người dùng cắm usb vào máy và khởi chạy Rufus, tìm và chọn file ISO Windows 10 và bấm bắt đầu để tạo bộ cài ra usb.
Các thao tác tạo thư mục autounattend.xml trả lời tự động như sau:
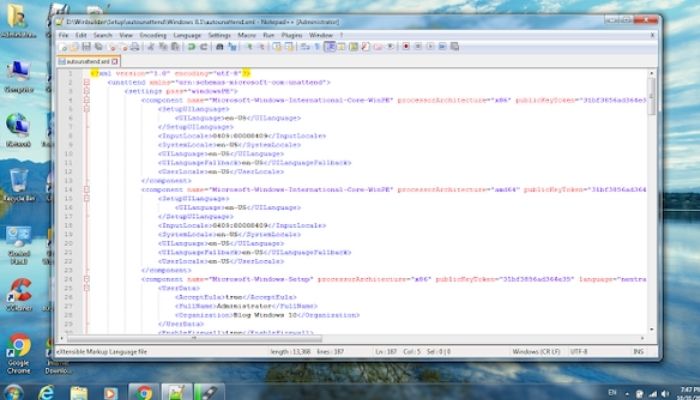
- Bước 1: Tại ô tìm kiếm của windows, nhập tìm kiếm Notepad.
- Bước 2: Ở cửa sổ Notepad, nhập đoạn code sau:
<?xml version=”1.0″ encoding=”utf-8″?>
<unattend xmlns=”urn:schemas-microsoft-com:unattend”>
<settings pass=”windowsPE”>
<component name=”Microsoft-Windows-International-Core-WinPE” processorArchitecture=”x86″ publicKeyToken=”31bf3856ad364e35″ language=”neutral” versionScope=”nonSxS” xmlns:wcm=”http://schemas.microsoft.com/WMIConfig/2002/State” xmlns:xsi=”http://www.w3.org/2001/XMLSchema-instance”>
<SetupUILanguage>
<UILanguage>en-US</UILanguage>
</SetupUILanguage>
<InputLocale>0409:00000409</InputLocale>
<SystemLocale>en-US</SystemLocale>
<UILanguage>en-US</UILanguage>
<UILanguageFallback>en-US</UILanguageFallback>
<UserLocale>en-US</UserLocale>
</component>
<component name=”Microsoft-Windows-International-Core-WinPE” processorArchitecture=”amd64″ publicKeyToken=”31bf3856ad364e35″ language=”neutral” versionScope=”nonSxS” xmlns:wcm=”http://schemas.microsoft.com/WMIConfig/2002/State” xmlns:xsi=”http://www.w3.org/2001/XMLSchema-instance”>
<SetupUILanguage>
<UILanguage>en-US</UILanguage>
</SetupUILanguage>
<InputLocale>0409:00000409</InputLocale>
<SystemLocale>en-US</SystemLocale>
<UILanguage>en-US</UILanguage>
<UILanguageFallback>en-US</UILanguageFallback>
<UserLocale>en-US</UserLocale>
</component>
<component name=”Microsoft-Windows-Setup” processorArchitecture=”x86″ publicKeyToken=”31bf3856ad364e35″ language=”neutral” versionScope=”nonSxS” xmlns:wcm=”http://schemas.microsoft.com/WMIConfig/2002/State” xmlns:xsi=”http://www.w3.org/2001/XMLSchema-instance”>
<UserData>
<AcceptEula>true</AcceptEula>
<FullName>Administrator</FullName>
<Organization>Blog Windows 10</Organization>
<ProductKey>
<Key>W269N-WFGWX-YVC9B-4J6C9-T83GX</Key>
</ProductKey>
</UserData>
<EnableFirewall>true</EnableFirewall>
</component>
<component name=”Microsoft-Windows-Setup” processorArchitecture=”amd64″ publicKeyToken=”31bf3856ad364e35″ language=”neutral” versionScope=”nonSxS” xmlns:wcm=”http://schemas.microsoft.com/WMIConfig/2002/State” xmlns:xsi=”http://www.w3.org/2001/XMLSchema-instance”>
<UserData>
<AcceptEula>true</AcceptEula>
<FullName>Administrator</FullName>
<Organization>Blog Windows 10</Organization>
<ProductKey>
<Key>W269N-WFGWX-YVC9B-4J6C9-T83GX</Key>
</ProductKey>
</UserData>
<EnableFirewall>true</EnableFirewall>
</component>
</settings>
<settings pass=”offlineServicing”>
<component name=”Microsoft-Windows-LUA-Settings” processorArchitecture=”x86″ publicKeyToken=”31bf3856ad364e35″ language=”neutral” versionScope=”nonSxS” xmlns:wcm=”http://schemas.microsoft.com/WMIConfig/2002/State” xmlns:xsi=”http://www.w3.org/2001/XMLSchema-instance”>
<EnableLUA>true</EnableLUA>
</component>
</settings>
<settings pass=”offlineServicing”>
<component name=”Microsoft-Windows-LUA-Settings” processorArchitecture=”amd64″ publicKeyToken=”31bf3856ad364e35″ language=”neutral” versionScope=”nonSxS” xmlns:wcm=”http://schemas.microsoft.com/WMIConfig/2002/State” xmlns:xsi=”http://www.w3.org/2001/XMLSchema-instance”>
<EnableLUA>true</EnableLUA>
</component>
</settings>
<settings pass=”generalize”>
<component name=”Microsoft-Windows-Security-SPP” processorArchitecture=”x86″ publicKeyToken=”31bf3856ad364e35″ language=”neutral” versionScope=”nonSxS” xmlns:wcm=”http://schemas.microsoft.com/WMIConfig/2002/State” xmlns:xsi=”http://www.w3.org/2001/XMLSchema-instance”>
<SkipRearm>1</SkipRearm>
</component>
</settings>
<settings pass=”generalize”>
<component name=”Microsoft-Windows-Security-SPP” processorArchitecture=”amd64″ publicKeyToken=”31bf3856ad364e35″ language=”neutral” versionScope=”nonSxS” xmlns:wcm=”http://schemas.microsoft.com/WMIConfig/2002/State” xmlns:xsi=”http://www.w3.org/2001/XMLSchema-instance”>
<SkipRearm>1</SkipRearm>
</component>
</settings>
<settings pass=”specialize”>
<component name=”Microsoft-Windows-International-Core” processorArchitecture=”x86″ publicKeyToken=”31bf3856ad364e35″ language=”neutral” versionScope=”nonSxS” xmlns:wcm=”http://schemas.microsoft.com/WMIConfig/2002/State” xmlns:xsi=”http://www.w3.org/2001/XMLSchema-instance”>
<InputLocale>0409:00000409</InputLocale>
<SystemLocale>en-US</SystemLocale>
<UILanguage>en-US</UILanguage>
<UILanguageFallback>en-US</UILanguageFallback>
<UserLocale>en-US</UserLocale>
</component>
<component name=”Microsoft-Windows-International-Core” processorArchitecture=”amd64″ publicKeyToken=”31bf3856ad364e35″ language=”neutral” versionScope=”nonSxS” xmlns:wcm=”http://schemas.microsoft.com/WMIConfig/2002/State” xmlns:xsi=”http://www.w3.org/2001/XMLSchema-instance”>
<InputLocale>0409:00000409</InputLocale>
<SystemLocale>en-US</SystemLocale>
<UILanguage>en-US</UILanguage>
<UILanguageFallback>en-US</UILanguageFallback>
<UserLocale>en-US</UserLocale>
</component>
<component name=”Microsoft-Windows-Security-SPP-UX” processorArchitecture=”x86″ publicKeyToken=”31bf3856ad364e35″ language=”neutral” versionScope=”nonSxS” xmlns:wcm=”http://schemas.microsoft.com/WMIConfig/2002/State” xmlns:xsi=”http://www.w3.org/2001/XMLSchema-instance”>
<SkipAutoActivation>true</SkipAutoActivation>
</component>
<component name=”Microsoft-Windows-Security-SPP-UX” processorArchitecture=”amd64″ publicKeyToken=”31bf3856ad364e35″ language=”neutral” versionScope=”nonSxS” xmlns:wcm=”http://schemas.microsoft.com/WMIConfig/2002/State” xmlns:xsi=”http://www.w3.org/2001/XMLSchema-instance”>
<SkipAutoActivation>true</SkipAutoActivation>
</component>
<component name=”Microsoft-Windows-SQMApi” processorArchitecture=”x86″ publicKeyToken=”31bf3856ad364e35″ language=”neutral” versionScope=”nonSxS” xmlns:wcm=”http://schemas.microsoft.com/WMIConfig/2002/State” xmlns:xsi=”http://www.w3.org/2001/XMLSchema-instance”>
<CEIPEnabled>0</CEIPEnabled>
</component>
<component name=”Microsoft-Windows-SQMApi” processorArchitecture=”amd64″ publicKeyToken=”31bf3856ad364e35″ language=”neutral” versionScope=”nonSxS” xmlns:wcm=”http://schemas.microsoft.com/WMIConfig/2002/State” xmlns:xsi=”http://www.w3.org/2001/XMLSchema-instance”>
<CEIPEnabled>0</CEIPEnabled>
</component>
<component name=”Microsoft-Windows-Shell-Setup” processorArchitecture=”x86″ publicKeyToken=”31bf3856ad364e35″ language=”neutral” versionScope=”nonSxS” xmlns:wcm=”http://schemas.microsoft.com/WMIConfig/2002/State” xmlns:xsi=”http://www.w3.org/2001/XMLSchema-instance”>
<ComputerName>PC</ComputerName>
<ProductKey>W269N-WFGWX-YVC9B-4J6C9-T83GX</ProductKey>
</component>
<component name=”Microsoft-Windows-Shell-Setup” processorArchitecture=”amd64″ publicKeyToken=”31bf3856ad364e35″ language=”neutral” versionScope=”nonSxS” xmlns:wcm=”http://schemas.microsoft.com/WMIConfig/2002/State” xmlns:xsi=”http://www.w3.org/2001/XMLSchema-instance”>
<ComputerName>PC</ComputerName>
<ProductKey>W269N-WFGWX-YVC9B-4J6C9-T83GX</ProductKey>
</component>
</settings>
<settings pass=”oobeSystem”>
<component name=”Microsoft-Windows-Shell-Setup” processorArchitecture=”x86″ publicKeyToken=”31bf3856ad364e35″ language=”neutral” versionScope=”nonSxS” xmlns:wcm=”http://schemas.microsoft.com/WMIConfig/2002/State” xmlns:xsi=”http://www.w3.org/2001/XMLSchema-instance”>
<AutoLogon>
<Password>
<Value></Value>
<PlainText>true</PlainText>
</Password>
<Enabled>true</Enabled>
<Username>Administrator</Username>
</AutoLogon>
<OOBE>
<HideEULAPage>true</HideEULAPage>
<HideOEMRegistrationScreen>true</HideOEMRegistrationScreen>
<HideOnlineAccountScreens>true</HideOnlineAccountScreens>
<HideWirelessSetupInOOBE>true</HideWirelessSetupInOOBE>
<NetworkLocation>Work</NetworkLocation>
<SkipUserOOBE>true</SkipUserOOBE>
<SkipMachineOOBE>true</SkipMachineOOBE>
<ProtectYourPC>1</ProtectYourPC>
</OOBE>
<UserAccounts>
<LocalAccounts>
<LocalAccount wcm:action=”add”>
<Password>
<Value></Value>
<PlainText>true</PlainText>
</Password>
<Description></Description>
<DisplayName>Administrator</DisplayName>
<Group>Administrators</Group>
<Name>Administrator</Name>
</LocalAccount>
</LocalAccounts>
</UserAccounts>
<RegisteredOrganization>Blog Windows 10</RegisteredOrganization>
<RegisteredOwner>Administrator</RegisteredOwner>
<DisableAutoDaylightTimeSet>false</DisableAutoDaylightTimeSet>
<TimeZone>SE Asia Standard Time</TimeZone>
</component>
<component name=”Microsoft-Windows-Shell-Setup” processorArchitecture=”amd64″ publicKeyToken=”31bf3856ad364e35″ language=”neutral” versionScope=”nonSxS” xmlns:wcm=”http://schemas.microsoft.com/WMIConfig/2002/State” xmlns:xsi=”http://www.w3.org/2001/XMLSchema-instance”>
<AutoLogon>
<Password>
<Value></Value>
<PlainText>true</PlainText>
</Password>
<Enabled>true</Enabled>
<Username>Administrator</Username>
</AutoLogon>
<OOBE>
<HideEULAPage>true</HideEULAPage>
<HideOEMRegistrationScreen>true</HideOEMRegistrationScreen>
<HideOnlineAccountScreens>true</HideOnlineAccountScreens>
<HideWirelessSetupInOOBE>true</HideWirelessSetupInOOBE>
<NetworkLocation>Work</NetworkLocation>
<SkipUserOOBE>true</SkipUserOOBE>
<SkipMachineOOBE>true</SkipMachineOOBE>
<ProtectYourPC>1</ProtectYourPC>
</OOBE>
<UserAccounts>
<LocalAccounts>
<LocalAccount wcm:action=”add”>
<Password>
<Value></Value>
<PlainText>true</PlainText>
</Password>
<Description></Description>
<DisplayName>Administrator</DisplayName>
<Group>Administrators</Group>
<Name>Administrator</Name>
</LocalAccount>
</LocalAccounts>
</UserAccounts>
<RegisteredOrganization>Blog Windows 10</RegisteredOrganization>
<RegisteredOwner>Administrator</RegisteredOwner>
<DisableAutoDaylightTimeSet>false</DisableAutoDaylightTimeSet>
<TimeZone>SE Asia Standard Time</TimeZone>
</component>
</settings>
</unattend>
- Bước 3: Lưu đoạn code thành tệp tin với tên autounattend.xml dưới định dạng All Files và Encoding UTF-8.
- Bước 4: Copy tệp tin có chứa code vừa lưu vào usd vừa tạo bộ cài đặt.
Bước 2: Tạo máy tính ảo với Vmware
Sau khi đã di chuyển các tệp tin cần thiết để rebuild windows 10, người dùng sẽ tiếp tục sử dụng USB đó để tạo máy tính ảo bằng Vmware. Khi tiến hành tạo máy ảo với Vmware, người dùng gắn file ISO Windows 10 vào máy và chọn dung tích USB 2.0. Khi chuyển thư mục windows 10 vào Vmware, máy ảo sẽ bắt đầu được thiết lập. Người dùng sẽ tiến hành theo các bước sau:
- Bước 1: Trên thanh công cụ, nhấn vào mục VM.
- Bước 2: Chọn Removable Devices trong bảng vừa hiển thị, nhấn chọn mục Sony Storage Media.
- Bước 3: Chọn Connect (Disconnect from Host).
- Bước 4: Tại màn hình máy ảo, nhấn vào mũi tên lên xuống, chọn mục USB và nhấn Enter.
- Bước 5: Khi máy ảo bắt đầu quá trình cài đặt, tại cửa sổ Windows Setup, chọn Next.
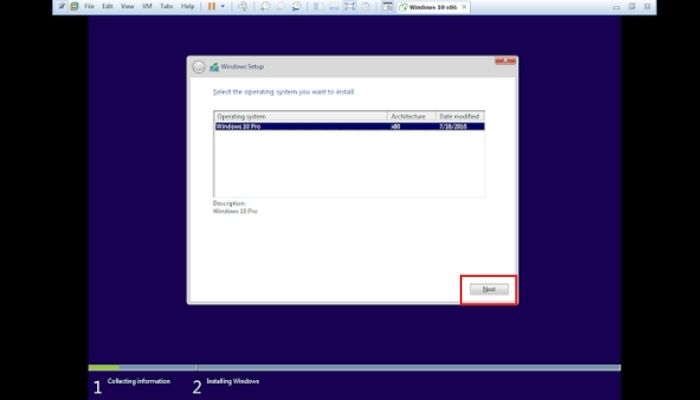
- Bước 6: Ở màn hình tiếp theo của máy ảo, nhấn chọn New, tạo và đặt tên cho máy ảo, chọn Apply và bấm OK để xác nhận.
- Bước 7: Cửa sổ tiếp theo sẽ có 2 lựa chọn: Partition 1 và Partition 2. Chọn Partition 1: System Reserved, chọn Delete và xác nhận bằng OK.
- Bước 8: Ở lựa chọn Partition 2, chọn Next để bắt đầu cài đặt máy ảo. Lúc này, dựa tên mã code ở tệp tin autounattend.xml được lưu trong usb, máy ảo sẽ được cài đặt tự động theo các thiết lập của code. Trong suốt quá trình này, người dùng tuyệt đối không nên rút USB ra khỏi máy cho đến khi hoàn tất cài đặt.
Bước 3: Cài đặt các phần mềm và ứng dụng cần thiết cho máy
Để cài đặt các phần mềm cho máy ảo để rebuild Windows 10, người dùng cần thực hiện theo các bước:
- Bước 1: Ngắt kết nối với máy tính ảo.
- Bước 2: Tạo và đặt tên một thư mục tùy ý trong usb.
- Bước 3: Di chuyển các phần mềm cần thiết vào thư mục vừa tạo.
- Bước 4: Kết nối lại với máy tính ảo Windows 10.
- Bước 5: Dẫn lối tắt của phần mềm ra màn hình chính của máy tính.
Dù là windows được rebuild, máy tính ảo vẫn cần có các ứng dụng phổ biến của Microsoft như bộ ứng dụng Microsoft Office. Để cài đặt Microsoft Office cho máy tính rebuild windows 10, người dùng tiến hành như sau:
- Bước 1: Tại Start, chọn mở Setting.
- Bước 2: Thay thế bộ cài đặt ISO Vmware Boot bằng bộ cài đặt ISO Office.
- Bước 3: Sau khi quá trình cài đặt hoàn tất, người dùng nên dẫn lối tắt của các ứng dụng như Word, Excel, PowerPoint, … ra giao diện màn hình chính.
Kết luận
Rebuild windows giúp người dùng tiết kiệm được thời gian thao tác và cài đặt với so với bản cài đặt gốc. Khi rebuild windows, người dùng cần quan tâm đến các lưu ý nhất định để quá trình rebuild không gặp lỗi hoặc trục trặc. Người dùng có thể làm theo các bước của hướng dẫn rebuild windows 10 để tự rebuild windows tại nhà.